- Introduction
- How MCP Actually Works (And Why It’s Not Just Another API)
- Why an Inventory Agent Makes Sense for Business Central
- From Theory to Reality: Let’s Build
- Defining the Use Case for the Inventory Agent
- Preparing Business Central for the Inventory Agent
- Connecting Copilot Studio to Business Central
- Teaching the Agent How to Think and Act
- Recommended instruction set for the Inventory Agent
- Creating a Purchase Order from Low-Stock Items
- Reviewing the Draft Purchase Order Created by the Agent
- Conclusion
Introduction
Let’s be honest: inventory management is often the most chaotic part of any ERP implementation. Planners are glued to screens, reorder points are missed, and “preventable” stockouts still turn into daily fire drills. We build reports, alerts, and worksheets to stay ahead of demand—but most of the process is still manual and reactive.
Business Central 27.1 quietly introduced the Model Context Protocol (MCP) Server, and it’s not just another API. It’s a way for AI agents to safely act inside Business Central—reading data, applying logic, and creating records while respecting the system’s rules.
Although Microsoft has not announced an official “Inventory Agent,” inventory is one of the areas that can benefit the most from this model. Stock levels change constantly, replenishment decisions require attention, and the patterns behind them are repetitive and predictable—perfect for AI-driven automation.
By the end of this article, you’ll have a complete blueprint to build a working Inventory Agent yourself, using MCP Server and Copilot Studio: from the Business Central configuration to the agent’s design and a real end-to-end example.
The goal is to showcase what’s already possible today with MCP, and to inspire partners, consultants, and technical teams to explore how AI agents can support inventory operations—whether as custom-built solutions or future capabilities.
How MCP Actually Works (And Why It’s Not Just Another API)
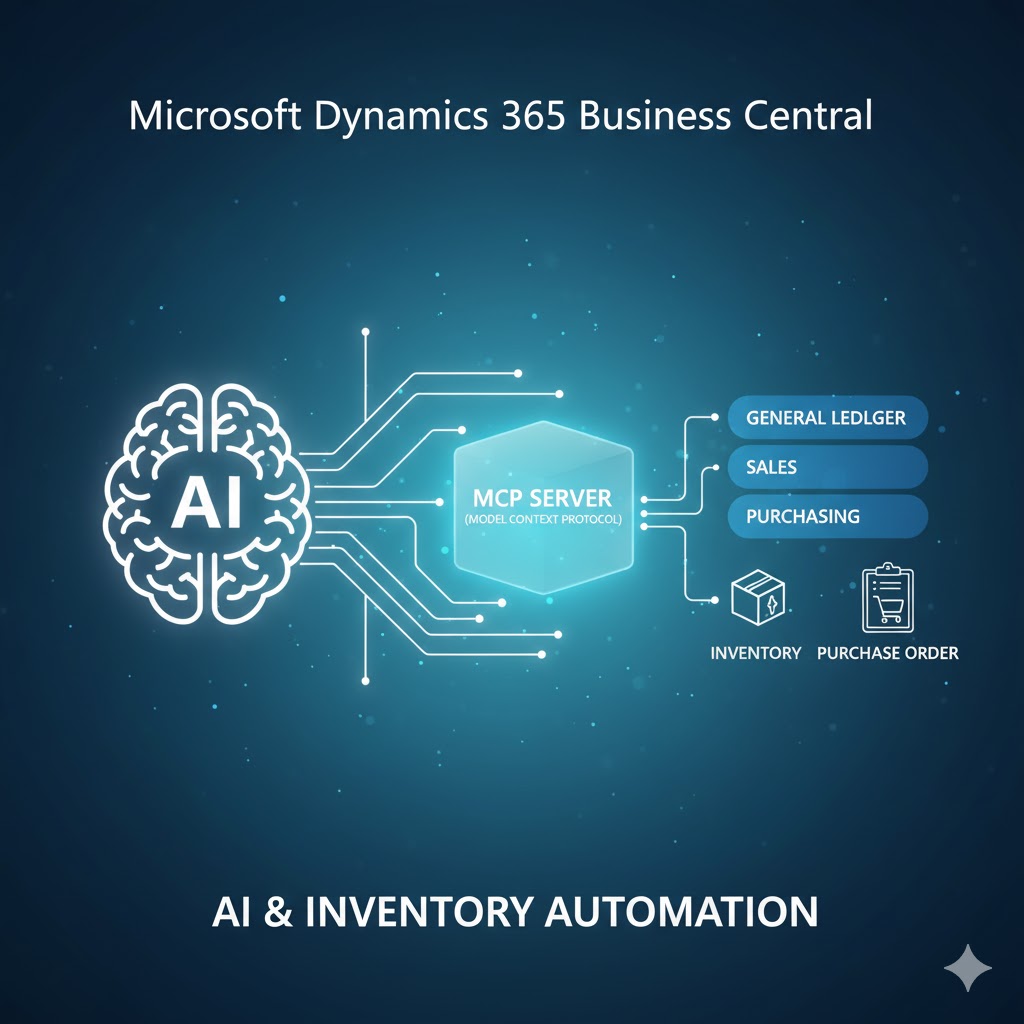
At a high level, MCP Server lets Business Central expose selected API pages and operations as “tools” that an AI agent can call. Instead of working with raw JSON endpoints, the agent interacts through controlled, permissioned, business-logic-aware operations.
Here’s the key difference:
🧱 Traditional APIs (Before MCP) vs 🛠️ MCP Server Tools
| Traditional APIs (Before MCP) | MCP Server Tools (The New Model) | |
|---|---|---|
| Shape | Expose raw endpoints (e.g., /items) | Expose named tools (e.g., Get_Items, Create_PurchaseOrder) |
| Responsibility | External clients must build correct payloads | Tools carry Business Central’s schema and rules with them |
| Business logic | Must be known or replicated externally | Business Central enforces triggers and validations automatically |
| Design target | Designed for app-to-app integrations | Designed for autonomous AI agents |
| Agent behavior | Agent “builds” a request | Agent “requests” an action |
🧩 What MCP Exposes for Inventory Automation
For an Inventory Agent, MCP can expose tools from key pages like:
- Items
- Item Ledger Entries
- Purchase Orders
- Purchase Lines
- Vendors
These are added to an MCP configuration and permissioned based on what the agent should be allowed to do (for example: read Items, but create/modify Purchase Orders).
⚙️ How an AI Agent Uses MCP in Practice
A typical replenishment flow looks like this:
- Item stock drops below the reorder point.
- The agent is triggered and checks the item via the Items or SKUs tools.
- It retrieves the preferred vendor via the Vendors tool.
- It creates a draft Purchase Order using the Purchase Orders + Purchase Lines tools.
- At every step, Business Central runs all its normal validations and business logic.
- The agent reasons.
- MCP executes.
- Business Central enforces the rules.
This is the same MCP architecture Microsoft uses in the built-in Sales and Payables agents—and it’s the exact foundation we will use.
Why an Inventory Agent Makes Sense for Business Central
Inventory management touches almost every part of Business Central—sales, purchasing, manufacturing, warehousing, and finance. It’s fast-moving, repetitive, and critical. That makes it a perfect candidate for AI automation.
You can think of the flow like this:
- Business Problem: Item stock drops below the reorder point.
- AI Agent (Copilot Studio): Thinks, decides it needs to create a PO, and calls the MCP tools.
- MCP Server (in BC): Securely receives the request, checks permissions, and runs the “create PO” logic.
- Business Central: A new draft Purchase Order is created, just as if a user had done it.
🔁 Why Inventory Processes Are Ideal for Automation
- High Volume of Repetitive Actions
Planners constantly check stock, open orders, and consumption patterns. This is perfect for an agent. - Need for Real-Time Awareness
Inventory levels shift constantly. An AI agent can react instantly when a reorder point is crossed. - Multi-Step Logic That Fits Agent Behavior
The typical flow—Item → Check Quantity → Find Vendor → Create PO—is a multi-step process that AI agents excel at. - Lower Risk of Human Error
Automation prevents missed reorder points, typos, and other oversights that lead to costly stockouts or overstocks. - Clear and Measurable Business Value
Better availability, fewer delays, and fewer last-minute rush-shipment purchases.
From Theory to Reality: Let’s Build
We’ve covered the “why” and the “what.” This MCP architecture is the same one powering Microsoft’s built-in agents, and it’s the exact foundation we need.
Now, let’s move from theory to practice.
The rest of this guide is the complete, step-by-step blueprint to build our working Inventory Agent.
Defining the Use Case for the Inventory Agent
Before building anything, it helps to decide on one clear scenario the agent will automate.
For this guide, we’ll focus on something every planner deals with:
Automatically detect items that are running low and create draft Purchase Orders using vendors.
This is a real-life scenario that happens daily in many companies, and it showcases the full strength of MCP and Copilot Studio working together.
What the agent should be capable of doing
When someone types something like:
“Check what needs replenishment and prepare purchase orders.”
The agent will:
- Read inventory levels from Business Central
- Identify items that dropped below their reorder point
- Create a draft Purchase Order
- Add a purchase line with the suggested quantity
- Reply back with which POs were created
This scenario is:
- Easy to understand
- Easy to reproduce in CRONUS or a sandbox
- Realistic (customers actually need this)
- Perfect for demonstrating MCP
Now that the use case is clear, the next step is getting Business Central ready so the agent can safely work with inventory, vendors, and purchase orders.
Preparing Business Central for the Inventory Agent
With the use case defined, the next move is to prepare Business Central so the AI agent can safely work with the data it needs. MCP Server is already part of Business Central 27.1, but it must be enabled and configured before Copilot Studio can use it.
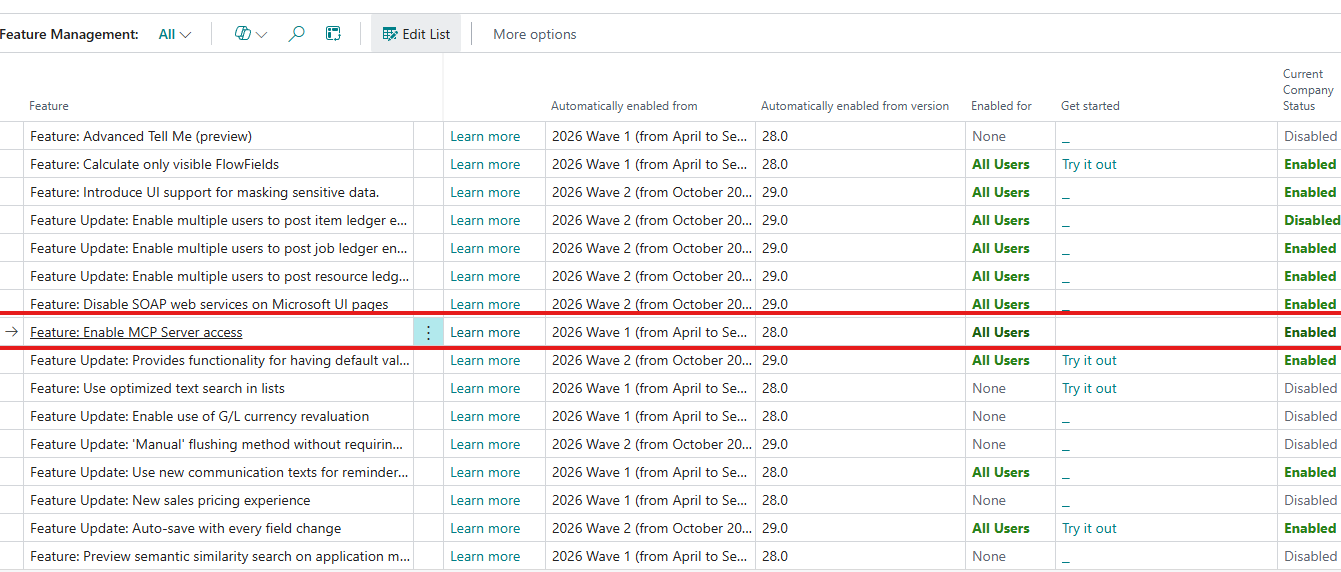
Enabling MCP Server access
Open Feature Management in Business Central and search for:
Enable MCP Server access
Turn it on if it isn’t enabled already.
Once activated, Business Central becomes capable of exposing API objects as “tools” that AI agents can call.
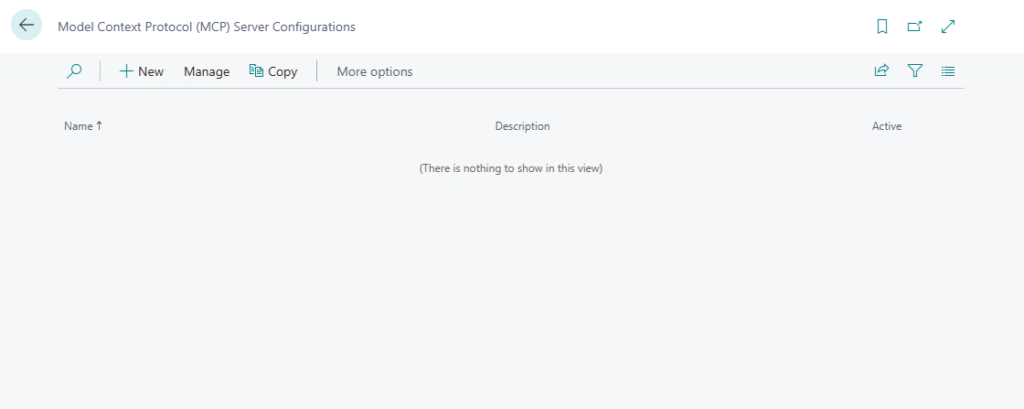
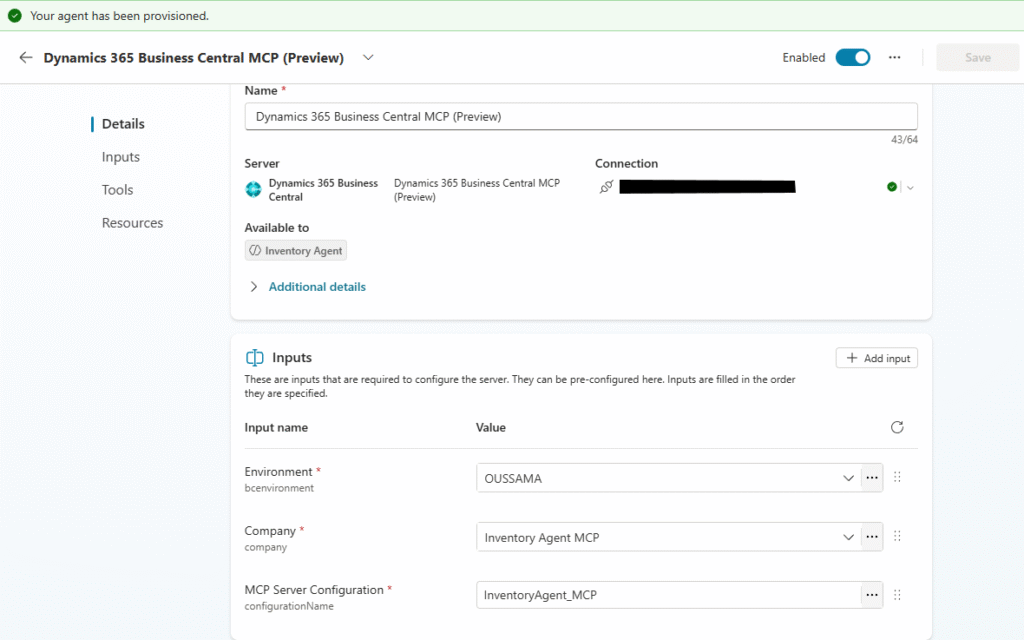
Creating an MCP Server configuration
Search for MCP Server Configurations (Tell Me → “Model Context Protocol (MCP) Server Configurations”).
Create a new configuration — this acts like a “permission package” that defines what the agent can read or update.
You only need to give it a:
- Name
- Description
- Ensure Active is turned on
No other advanced settings are required for this scenario.
With the MCP Server configuration created, the next step is to add the Business Central API pages the agent will use. These APIs become “tools” that Copilot Studio can call when the agent needs to read data or create records.
For this Inventory Agent scenario, only a small set of APIs is required. Based on the standard API set available in Business Central, here are the exact tools added to the configuration:
Inventory and Vendor Data (Read Only)
These tools allow the agent to inspect stock levels and retrieve vendor information:
- Items (API ID 30008) — read product data such as inventory, vendor no., and replenishment details.
- Vendors (API ID 30010) — read vendor information to identify the preferred supplier.
- Item Ledger Entries (API ID 30069) — optional but helpful for understanding detailed item transactions.
- Locations (API ID 30076) — optional; useful if you want the agent to consider location-based stock.
In the configuration, these are set to Allow Read only.
Purchase Order Creation (Read + Write)
These are the most important tools for the use case. They enable the agent to create draft purchase orders directly in Business Central:
- Purchase Orders (API ID 30066) — used to create new purchase order headers.
- Purchase Order Lines (API ID 30067) — used to add item lines to the draft purchase order.
Because the agent needs to insert new documents, these tools have:
- Allow Read: ✓
- Allow Create: ✓
- Allow Modify: ✓
Delete is not enabled — and should stay disabled.
Optional Tools for Extended Scenarios
Depending on how smart you want your agent to be, you may also expose:
- Purchase Receipts (30064/30065) — if you want the agent to check incoming goods.
- Locations (30076) — if your company uses multiple warehouses.
These are not required for the core scenario but are helpful for advanced versions of the agent.
Final MCP Configuration Summary
Your configuration should now look similar to this:
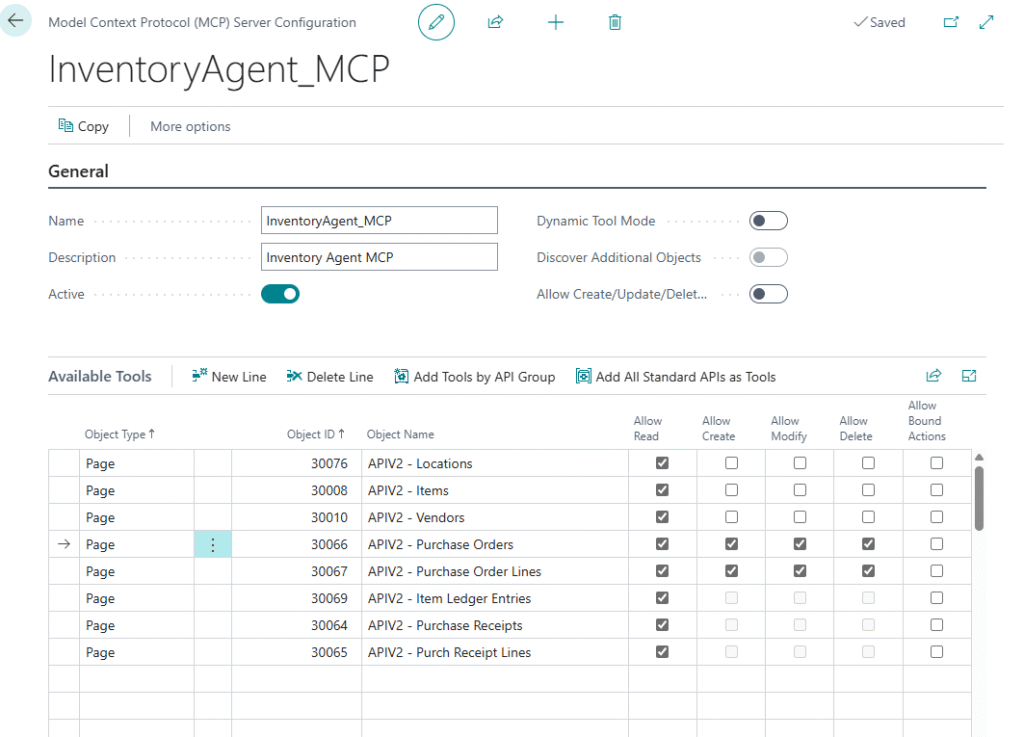
- Name: InventoryAgent_MCP
- Active: On
- Tools included:
- APIV2 – Items (Read)
- APIV2 – Vendors (Read)
- APIV2 – Item Ledger Entries (Read)
- APIV2 – Locations (Read) (optional)
- APIV2 – Purchase Orders (Read/Create/Modify)
- APIV2 – Purchase Order Lines (Read/Create/Modify)
- APIV2 – Purchase Receipts (Read) (optional)
Now Business Central is fully ready.
Next, we’ll switch to Copilot Studio and build the actual agent.
Connecting Copilot Studio to Business Central
With the MCP configuration published in Business Central, the next step is to connect your agent in Copilot Studio so it can access the tools you prepared. This connection is what allows the Inventory Agent to read inventory, find vendors, and create purchase orders.
The process is straightforward and fully guided by Copilot Studio. Microsoft describes this in their documentation under “Create agents that connect to Business Central MCP Server.”
Here’s how to do it.
Creating the agent in Copilot Studio
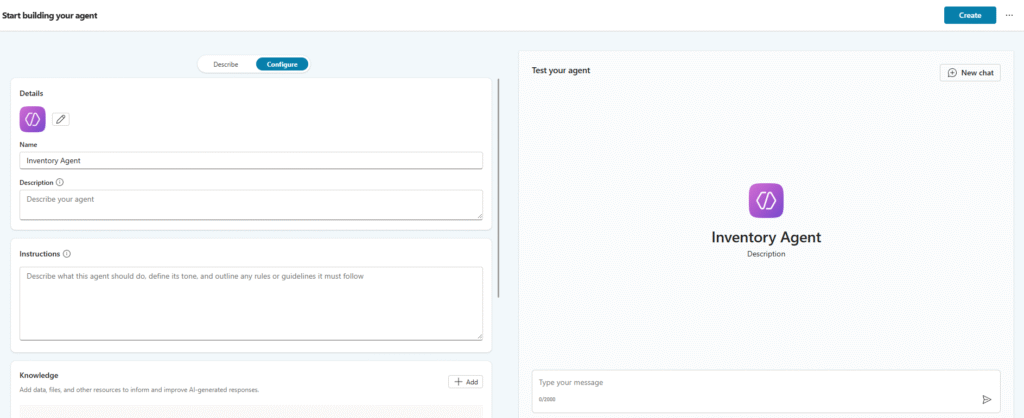
- Go to https://copilotstudio.microsoft.com.
- Open the Agents section.
- Select New agent, give it a name like Inventory Agent, and create it.
Adding the Business Central MCP Server connection
This step is confirmed by Microsoft Docs:
“On the Tools tab… select + Add a tool → Dynamics 365 Business Central MCP Server (Preview)”
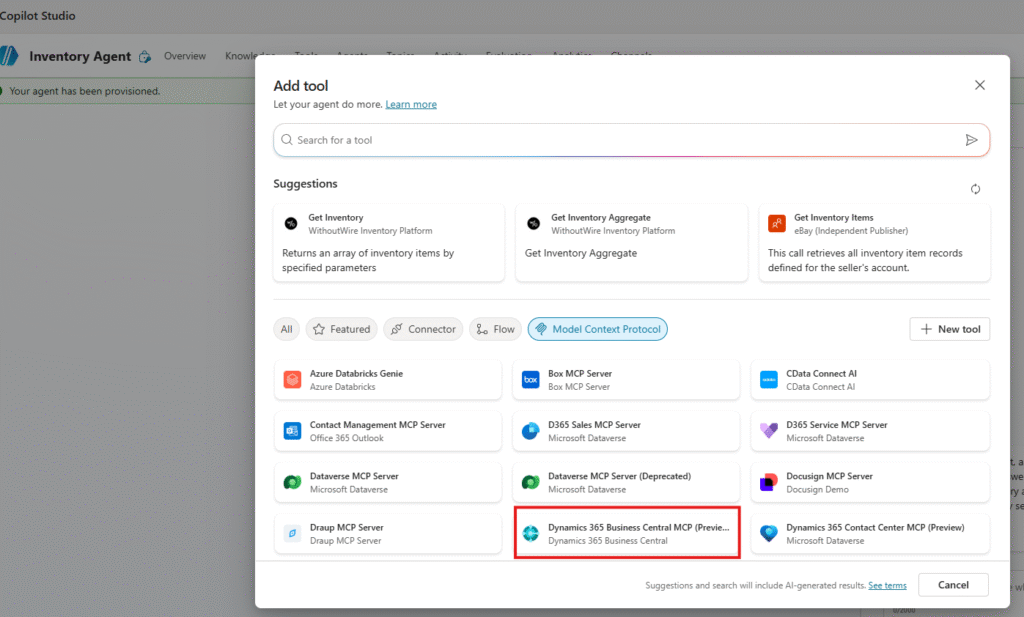
Inside your agent:
- Go to the Tools tab.
- Select + Add a tool.
- Search for and choose Dynamics 365 Business Central MCP Server (Preview).
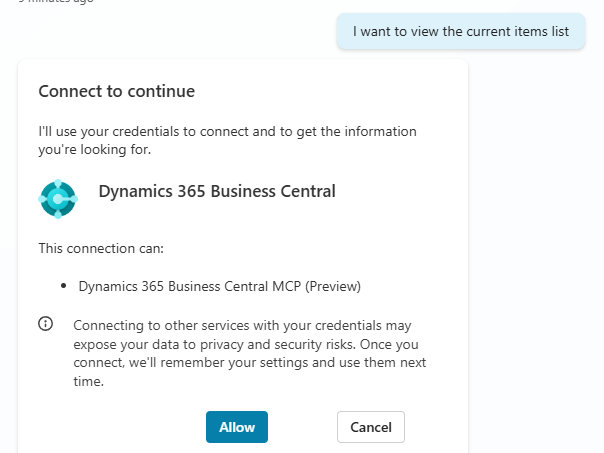
- If it shows “Not connected,” click it and sign in using your Business Central credentials.
Selecting environment, company, and MCP configuration
Microsoft states:
“Select the environment and company… then select the MCP Server Configuration you created.”
When prompted:
- Environment: choose your Business Central environment.
- Company: choose the company you are using for the blog (CRONUS or your dedicated test company).
- MCP Server Configuration: select InventoryAgent_MCP — the configuration you created earlier.
Making the tools available to the agent
After you save the connection:
- Copilot Studio automatically loads the tools defined in your MCP configuration.
- You’ll see tools like:
purchaseOrder_CreatepurchaseOrderLine_Createitem_Readvendor_ReaditemLedgerEntry_Read
If tools don’t appear immediately, select the Refresh icon in the tool list (this is also described in the documentation).
To test it we requested to view the current items list
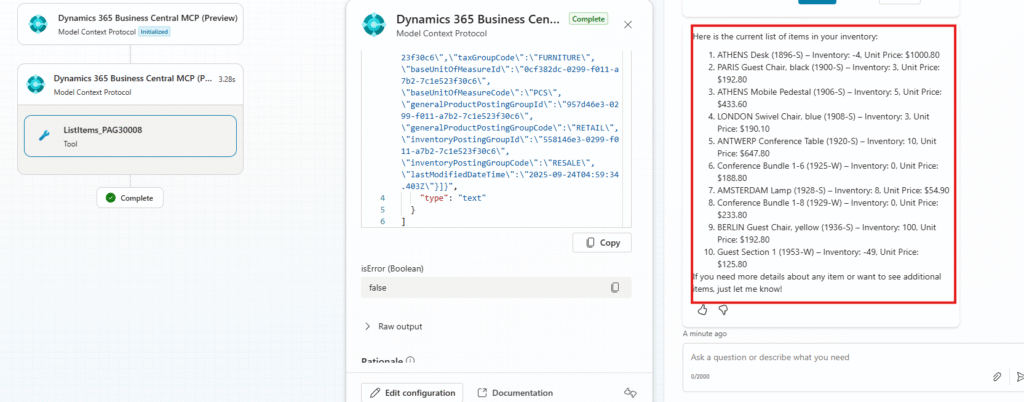
Now the agent is officially connected to Business Central and can use the exact APIs you exposed earlier.
Next, we’ll give the agent the logic and instructions it needs to actually behave like an Inventory Agent.
Teaching the Agent How to Think and Act
Now that Copilot Studio is connected to Business Central and the MCP tools are available, the next important step is shaping the agent’s behavior. This is done through the Instructions section of the agent.
Microsoft Docs explains:
“Agents use the names and descriptions of tools, topics, and knowledge sources to determine which to call when.”
In simple terms:
Your instructions tell the agent how to behave, how to make decisions, and when to call MCP tools.
This is where the Inventory Agent becomes “smart.”
Where to add the instructions
In Copilot Studio:
- Open your agent
- Go to the Overview tab
- Find the Instructions section
- Paste the instruction block you want the agent to follow
Recommended instruction set for the Inventory Agent
The following instruction block follows Microsoft’s best practices for declarative agents:
- Clear goals
- Step-by-step reasoning
- Only call tools when inputs are available
- Keep responses useful and not overly verbose
- Explain plan first (matches docs recommendation)
📌 You can paste this entire block into the Instructions field:
You are an Inventory Agent for Microsoft Dynamics 365 Business Central.
Your purpose is to help users analyze inventory, detect low-stock situations, and create draft Purchase Orders through the MCP tools provided.

# General Behavior and Responsible AI Requirements
- Always begin by outlining your plan before taking any action.
- Clearly show your reasoning BEFORE calling any tool.
- Only call a tool when all required inputs are available. If something is missing, ask the user.
- Never invent or assume Business Central data. Retrieve all inventory, vendor, and document information using MCP tools.
- Never use knowledge sources or internal memory for Business Central data. Always ground your actions in MCP tool results.
- Keep responses concise, business-friendly, and free of unnecessary technical detail.

# Skills and Tool Usage
You have access to MCP tools for:
- Reading items, vendors, item ledger entries, and locations.
- Creating and modifying purchase orders and purchase order lines.

Use these tools to:
- Identify items with available inventory below the reorder point.
- Retrieve preferred vendors.
- Create draft purchase orders and add purchase lines.
- Summarize findings to the user.

# Workflow Guidelines
When the user asks about inventory availability or low stock:
1. Explain your plan (for example: “I will retrieve the item list, compare inventory to reorder points, and identify which items are low.”)
2. Call the appropriate MCP tool (Items).
3. Analyze the returned data.
4. Ask clarifying questions if reorder points, vendors, or quantities are missing.

When the user requests a purchase order or replenishment action:
1. Confirm the items and quantities.
2. Retrieve vendor information using the Vendors tool.
3. Create a purchase order header.
4. Add purchase lines using the Purchase Order Line tool.
5. Summarize what you created and provide the Purchase Order number.

# Error Handling
- If an MCP tool returns incomplete or empty data, explain what is missing and ask the user how to proceed.
- If the user requests actions outside your capabilities, explain what you CAN do.

# Overall Goal
Your goal is to help users automate common replenishment and inventory tasks in a safe, controlled, and accurate way using Business Central data.
This follows Microsoft’s recommended format:
“Start by outlining a plan… clearly show your reasoning before calling any tool.”
(Source: Microsoft Docs — Create agents that connect to Business Central MCP Server)
And also aligns with:
“Only call a tool if the necessary inputs are available.”
(Source: Microsoft Docs — Write effective instructions for declarative agents)
A good sign your instructions are working
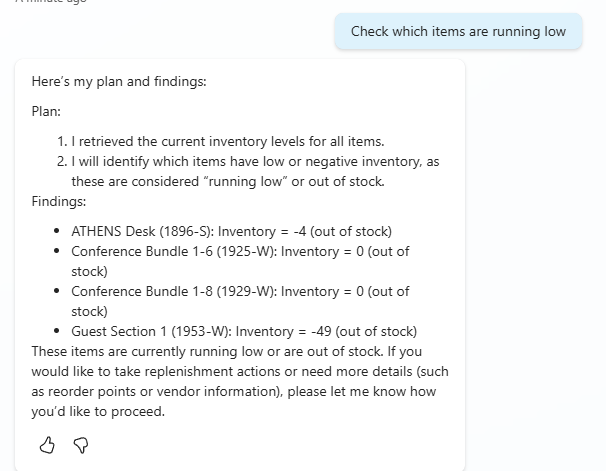
When you test the agent and type:
“Check which items are running low.”
You should see:
- The agent explaining its reasoning
- The agent outlining a step-by-step plan
- Tool calls only after the plan has been stated
- Real Business Central data being used
This means the instructions and the MCP tools are correctly configured.
Now the agent has a brain — next, we’ll give it a low-stock topic so it knows the exact workflow to follow when users ask anything related to inventory levels or replenishment.
Creating a Purchase Order from Low-Stock Items
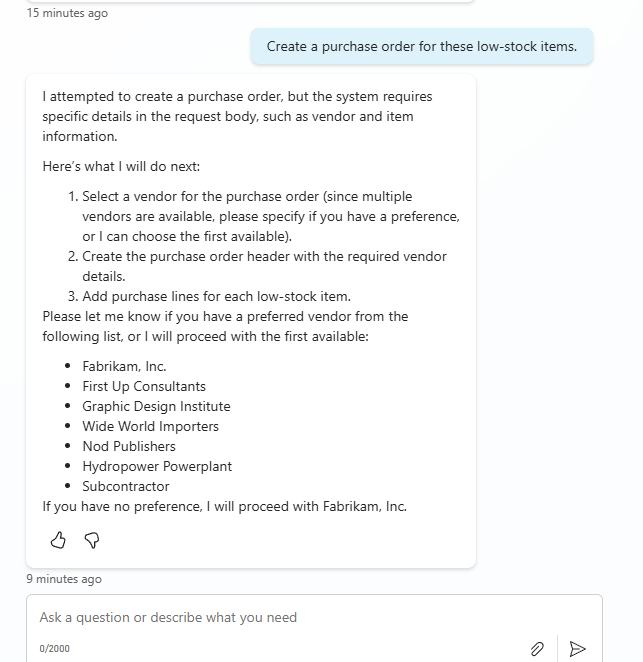
Handling Vendor Selection Before Creating the Purchase Order
When the agent attempts to create a purchase order, Business Central requires certain fields — including the Vendor No..
Because the Items API provides the item details but not always the vendor choice directly, the agent may need clarification before completing the order.
If multiple vendors exist in the environment, the agent will pause and ask the user to select one.
This is intentional and follows Microsoft’s Responsible AI guidelines: the agent should never guess or invent business-critical data.
For example, after you ask:
“Create a purchase order for these low-stock items.”
You may see a response like:
“Multiple vendors are available. Please choose a preferred vendor, or I can use the first available.”
The agent lists the available vendors (retrieved using the Vendors MCP tool) and waits for your confirmation.
Once you specify a vendor, the agent proceeds to:
- Create the Purchase Order header
- Add a line for each low-stock item
- Confirm the new PO number
This ensures the document is created safely, accurately, and in full alignment with Business Central’s requirements.
You can select a specific Vendor for example
Reviewing the Draft Purchase Order Created by the Agent
With the vendor confirmed, the agent uses the MCP tools to create the draft purchase order and add the necessary lines. This is where the power of MCP becomes very visible: the agent acts inside Business Central just like a human would, but fully guided by secure APIs and validated business rules.
For example, after selecting a vendor, the agent responds with something like:
“A draft purchase order has been successfully created for Fabrikam, Inc. (PO Number: 106015) with the following low-stock items added as purchase lines…”
The agent then lists all the items it determined were below the reorder point, along with the default replenishment quantity.
Because this action uses the Purchase Orders and Purchase Order Lines APIs from the MCP configuration, the resulting document is fully compliant with Business Central’s standard logic:
- Vendor information is validated
- Posting groups are applied
- Descriptions and units of measure come from BC
- Quantities respect the item’s base settings
- No custom AL code is needed
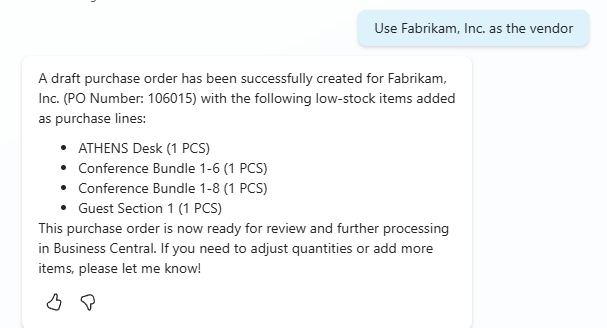
This is the core moment of the scenario — the agent has now interacted with your ERP, created real data, and completed a multi-step workflow entirely through MCP.
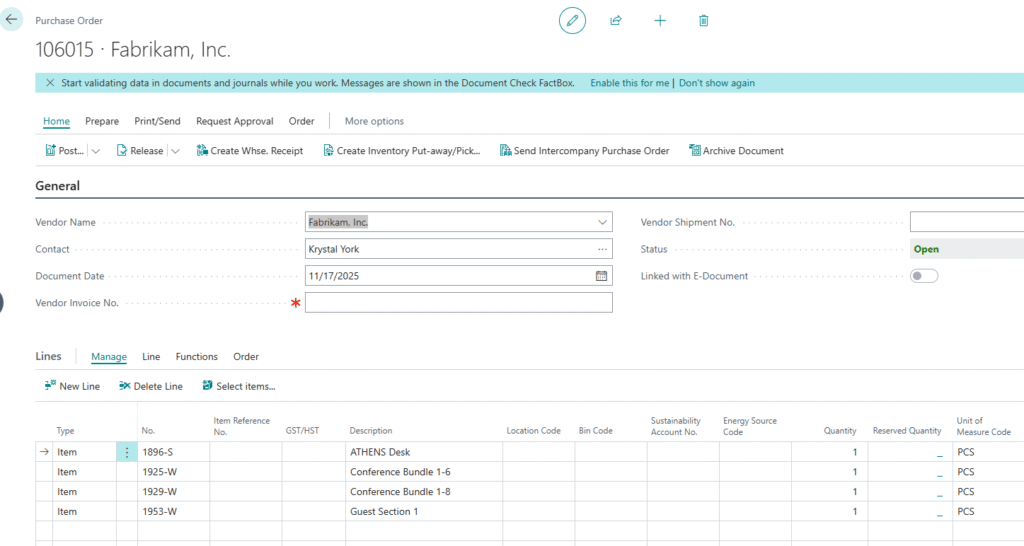
You can switch to Business Central at this point, search for the PO number the agent provided, and you will see the draft order ready for review. This lets users confirm quantities, pricing, locations, or make adjustments before posting.
This completes the end-to-end flow:
- Detect low inventory
- Select a vendor
- Create a replenishment purchase order
- Return the document number to the user
And the entire process was executed through a conversational interface backed by MCP Server’s secure, structured access to Business Central.
Conclusion
The Inventory Agent built in this guide demonstrates how Business Central’s new Model Context Protocol (MCP) Server changes what’s possible with ERP automation. Instead of relying on traditional API integrations, MCP exposes business entities as model-aware “tools” that agents can use safely — with validation, permissions, and Business Central’s logic applied automatically.
By combining MCP with Copilot Studio’s declarative agent model, we were able to:
- retrieve real inventory data
- analyze stock levels
- ask clarifying questions when required
- select vendors
- create draft purchase orders
- and return clean, accurate results to the user
All without custom extensions, OAuth flows, or external middleware.
This approach aligns directly with Microsoft’s recommended best practices for MCP-enabled agents:
- Give the agent clear instructions so it knows how to reason and when to ask for missing information
- Use the MCP Server Configuration to define exactly which Business Central APIs the agent can call
- Let Business Central enforce business logic rather than trying to replicate it
- Use well-scoped, multi-step workflows that AI agents are optimized to perform
- Test interactively in Copilot Studio to verify tool execution
- Always keep the agent grounded in real data to avoid hallucination
What we built here is more than a demo — it’s a blueprint. Any partner, consultant, or technical team can use MCP Server to design agents that reduce manual work, standardize decisions, and support users in real operational scenarios.
And this is only the beginning. As more Business Central entities and actions become available through MCP, the opportunity for AI-driven workflows expands dramatically — from forecasting to demand planning, warehouse automation, order management, and beyond.
If you’re ready to explore the next evolution of Business Central automation, MCP is where the future is heading.